Wednesday, December 28, 2016

Story Stones


Prairie Fire

STONES LOVE TO TELL A STORY!


          If you Google “story stones” you’ll be pointed to web sites where people have painted or otherwise added something to a rock in order to give it an element of interest and possibly make it an element of storytelling and sharing.
Not me.
My story stones already come with wonderful stories in them and the only thing I need to do to reveal the story, is to remove the excess rock, shape, and polish. Admit it; you’ve done the same thing. You look at a rock or a slab and say to yourself, ‘that looks just like a _____!’ Then your job comes down to using your lapidary skills to make it apparent to everyone else.

SHAPE IS PART OF THE STORY

          I often find that a stone can tell its story within the constraints of the shapes available on lapidary templates, but not always. Sometimes you have to listen to how the stone tells its story best. For example, in “Prayer” below, I did it free-form because I felt the capsule around the praying figure would highlight it best if it  
followed the lines of the figure.

Prayer

      I found this little beauty (it’s much smaller than it looks in the image) in a discard pile! It’s a beautiful quartz that took a high polish and I’m planning to have it made into a ring someday.


PATTERN CAN TELL THE STORY


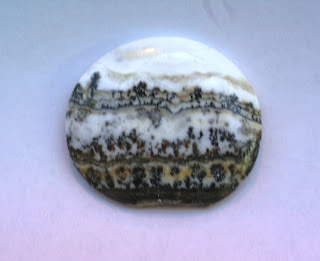
     In this chatty silver lace opal, you can see the tree-lined, muddy river at the bottom and the vineyard higher up alone with a cloudy sky. Or at least that’s what I saw in the slab. It was originally part of a long almost ribbon-like slab and I made an oval cabochon to give it an old-fashioned look. What do you see?


 Tip! When you’re looking at likely slabs, try turning them slowly so you see it from different angles, otherwise, you may discard a chatty stone that couldn’t tell you its story from the first angle!

And finally,

Knee Bone


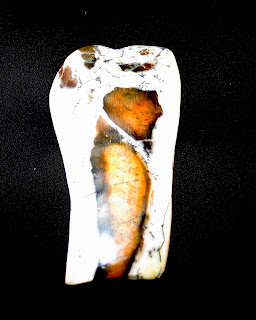
This one I call the “Knee Bone”.
The “marrow” part is a shiny jasper/quartz and the “calcified” part on the outside of the bone is, I believe, common opal. Notice how it flares out at the top and there’s even a little notch where it would fit with the bone above!

Have you worked on stones that insisted they had a story for you to bring out in them? I’d love to hear about it!  Click on Donna@LapidaryWhisperer.com

 
Yours for Lapidary Fun!
Your Lapidary Whisperer,
Donna Albrecht

Thursday, December 1, 2016

Remounting Eye-Catching Specimens


MOUNTING AND REMOUNTING EYE-CATCHING SPECIMENS

       When I’m buying at rock shows or collecting, I’m frequently confronted with gorgeous specimens that are not suitable for cabbing, but are too beautiful to put back. I’ve also had a chance to purchase a few small old collections for their cabbing material and find they contain various specimens either already mounted or loose.    

MOUNTING

      Sometimes I prefer to mount light-colored stones on a high-contrast material. For example, I had a nice group of quartz crystals. It had two issues. First, the bottom was very jagged and would scratch any surface it was displayed on, so I carefully ground it smooth-ish. I was afraid the whole time I was working on it that the crystals would separate and fall off, but I got lucky. A friend who is a woodworker made a simple base that reflected the basic shape of the specimen.


REMOUNTING 

 
I decided to try out the concept of remounting with this piece of Brazilian topaz. It’s more of a chip than a specimen, but the color is lovely.  The first thing was to get it out of this old paper box (1.5” square) where it had been stuck on some foam that had once been white. Then clean off the bits of old foam adhering to the stone. I soaked the glue that remained on the specimen in water or about a half-hour, and it was easily scraped off. 

TIP! Before you try this, make sure your specimen isn’t easily water soluble like halite (rock salt).

One of my considerations with the topaz was where it would be displayed. One place I have where I display a lot of specimens is a tri-level display case that is lit from on top and has two glass shelves to let the light get to all the shelves. Because of this, I tend to put small items toward the top because they will block less light. My larger specimens that are mounted on wood go on the bottom of the cabinet. Since an opaque base would block light and a translucent could alter the way the colors were seen on shelves below, I chose to use clear plastic to mount this specimen. If you’re remounting a specimen that will be on a surface where light transmission isn’t a concern, consider different colors, textures, or even other rocks to show off the unique colors and shapes of your specimen. 

                  I mounted the stone on a 1 ¼” round by 1/8” high clear plastic disk that I purchased at Tap Plastics. It had paper protectors on both sides so the disk didn’t get scratched. I wish the color showed up better in my after picture, but I can assure you it now looks spectacular under the lights in my display case! 
          Have you mounted or remounted a specimen? I’d love to hear about what it was and how you chose to handle it. I may be able to use it in a future blog! Send it to Donna@LapidaryWhisperer.com
          
If you like what you see here, please go to the top of the right side column and subscribe. You'll get my blog automatically delivered to you every two weeks


Your Lapidary Whisperer
Donna
 

Your Lapidary Whisperer
Donna Albrecht